Showing posts with label altered projects. Show all posts

Tuesday, November 22, 2011

Baby Shower Pics

My son, Malachi, and daughter-in-law, Courtney, are expecting their first baby together in January.  My daughter, Karissa, and I and Courtney’s mom gave them a baby shower last Thursday. 

Diaper Cake

{Please excuse the not-so-great photos.  My point and shoot just does not do what the Nikon does, but I didn’t want to chance destroying my husband’s camera in all the hustle and bustle of the day.} 

I made this diaper cake using the tutorial I found here.  It really didn’t take as long as I thought it would.  I had it finished in just a couple of hours.  A good movie is a great distraction to break the monotony of rolling 70 diapers! 

We had the guests sign the front of a story book for the guest book.

Shower Theme

We used the Sweet Vintage Shoppe  theme at Hostess {with the mostess}.   Their printables are fantastic, we just printed and framed them in frames that I spray painted white.  Aren’t those little yarn ice cream balls my daughter made adorable?   We placed them in  sundae glasses to make ice cream sundaes for the table décor.

Cupcakes

The cupcakes my daughter made.  She makes the BEST cupcakes!

Courtney

The mom-to-be opening the gifts with her mom.  There is something so exciting about baby stuff!  It’s just so adorable.

Keandra & Brooke

Keandra and Brooke, the aunts-to-be, excited about sharing this special day.  I know Keandra doesn’t look all that excited, but I promise you she was.

I hope everyone has a wonderful Thanksgiving!  I will be taking some time away from my blog to spend with family and recover from my surgery.

Thanks for stopping by today!

~Karen

Tuesday, November 1, 2011

Painted Books

I purchased some hard bound books some time ago with the intention of using the pages in some projects.  When I went to use them, my mind went in a total different direction.  Maybe it was because my hand has been missing my paint brush, but I had this idea to paint them.

I pulled out my Annie  Sloan Chalk Paint (which I love) in Old White and went to work.  I painted two coats on each book then distressed them with fine grit sandpaper.

Painted books

I brushed on an antiquing glaze that I quickly brushed off with a damp rag making sure to leave some streaks behind.  I then used a small brush to “flick” the glaze to create some paint splatters.

Painted Book edges

I glazed the edges of the pages as well.  I then stacked three of them and tied them with some twine.  They look perfect of my side table.

Stenciled book

I had a fourth book and stenciled a damask design with the same glaze I used to antique the book.  After the design was dry, I lightly sanded it with very fine sandpaper.  I LOVE the way it turned out!

Stenciled book tag

I made a tag with Papertrey’s Fall Elegance stamp set and tied it to some twine I wrapped around the book.  It looks lovely on a stand with my fall décor.

So that is what has been happening on my side of the blogosphere.  Oh, I did get to attend an Adobe Creative Suite workshop with my hubby on Friday.  That was fun and I learned so much.  I was on information overload when I walked out of there.  I am so looking forward to attending the Photoshop workshop next month.  So excited about that!!!!

I will leave you with this picture of our snowman in the fall.snowman in the fall

My kids had fun playing in the snow this past weekend and I enjoyed the down time.  Doesn’t that snowman look so out of place on the green grass with the green tree in the background?   So funny!

Thanks for stopping by today!

~Karen

Friday, April 1, 2011

Cricut Meets Cork

OLYMPUS DIGITAL CAMERA

So I had this thought that it would be so cool to decorate a plate with cork.  I pulled out my Cricut and my adhesive cork and set out to see if it would work.  I used a file that I found on The Free SVG Blog.  It cut pretty well, although I did have to clean up a few straggly pieces.  I cut it with the multi cut feature set to cut twice using the deep cut blade on 6, the pressure on 5 and the speed on 3.  I wouldn’t advice cutting it three times, as it was starting to crumble the edges a bit after the second time. 

After I cut it, I used some Angel Wings Shimmer paint to give it a little shimmer.  It looks great and I really love the texture!

I would love to see what you cut with cork.  Please leave a comment and share your link.

Thanks for stopping by!

~Karen

Thursday, March 17, 2011

Another Baby Gift

OLYMPUS DIGITAL CAMERA

Adorable!

I used a 12 inch square frame and covered the mat with silk zebra fabric.  The insert picture and info was designed using Photoshop CS5 and printed it onto glossy photo paper.

Friday, March 4, 2011

DIY: Decorated Wooden Letters

OLYMPUS DIGITAL CAMERA

I was asked to make some letters for a baby gift.  I made these letters to coordinate with the nursery bedding.  I LOVE the way they turned out and thought I would share with you how I did it and what worked for me.

~DIY Instructions~

1. Lightly sand the letters on both the front and the back.  Make sure to wipe all of the dust off the letters.  Paint the letters, let dry.  Paint a second coat.  Let dry completely.  I let mine dry overnight.

2. Stamp the flourishes.  I used Vintage Cream ink and it took a VERY long time to dry.  I heat dried it and it still smudged a little so I used Workable Fixative spray and that worked well.  Spray with 2-3 coats of sealer following the directions on the can.  Let dry completely.

3. Make the ribbon bow hangers.  Cut a 10 inch length of ribbon and staple evenly to the back of the letter using a staple gun.  Cut a 7 inch length of ribbon.  Place about a 1/2 inch piece of Scor-tape in the center and loop the ribbon ends to adhere in the center.  Cut another piece of ribbon about 7 inches and tie the loop bow to the hanger making a knot in the back.  This will adhere the bow to the ribbon hanger so that it can slide easily for adjustment. Trim the ends evenly.

4. Make the butterflies.  Large butterflies- Stamp the image onto vellum using ink that matches your cardstock.  Heat emboss using clear embossing powder.  Punch out the image with the butterfly punch.  Punch out another butterfly from the matching cardstock.  Bend the wings towards the center.  Adhere the vellum to the cardstock by placing a small amount of clear drying glue to the center.  Small butterflies- Punch out the butterfly from cardstock.  Cover the butterfly with adhesive and dip in glitter.  Bend the wings of the butterflies toward the center. Adhere the butterflies to the letter by painting E-6000 glue onto just the center of the butterflies.  Let dry completely.

~Supplies I used~

Wooden letters (Michael’s), Krylon Fusion spray paint in Expresso, Fancy Flourishes stamp set(Papertrey Ink), Vintage Cream ink , Krylon Workable Fixative, Krylon Satin sealer, Hibiscus Burst grosgrain ribbon, Hibiscus Burst ink and cardstock, butterfly stamp (Purple Daisy Designs), transcendence embossing powder,  large butterfly punch(EK Success), monarch butterfly punch (Martha Stewart), vellum, Scor-tape, Scotch clear glue (to adhere the vellum), Martha Stewart glue pen (to adhere the glitter), E-6000 glue (to adhere the  butterflies), staple gun


Thanks for stopping by!

Karen~

Thursday, February 10, 2011

Some Angel Company Love

Some time ago, before the sickness marathon in the family, I received my order of stamps from The Angel Company that I got with my contest winnings.  Well I spent an afternoon and went on a stamping frenzy, here is what I created.
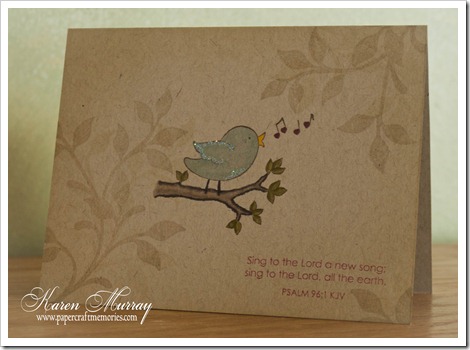
OLYMPUS DIGITAL CAMERA I tried my hand at a one layer card.  I started with a kraft base and stamped the little bird image from Singing Praises in Burnt Umber.  I colored it with Copic markers and because I can’t seem to make a card without some bling, I added some glitter to his wing and belly.  The sentiment from the same set is stamped in Moulin Rouge.  I stamped the leaves from Happily Grateful in Versamark Dazzle Frost ink and sponged all the edges using Haystack ink. 

OLYMPUS DIGITAL CAMERAI LOVE the way this card turned out.  The colors and the swirls just make me so happy.  I used the long swirl image from Wonderful News.  This stamp is such a great size for cardmaking.  It is long enough to stamp the entire length of the card with room to spare so you don’t have to worry about whether it is fitting right.  I heart effortless stamping.  I used Claret, Chartreuse and Cote d’Azure inks and alternated the colors saving Claret for the middle.  I die cut and embossed a piece of white cardstock with a Labels Four die and then stamped the coordinating stamp from Fabulous Frames in Chartreuse.  I stamped the sentiment from Wonderful News in Cote d’Azure ink and used a glue pen to add glitter to the embossed area of the die cut, added some pink gems and adhered it the my card with foam tape.

OLYMPUS DIGITAL CAMERA I made this card for my husband for Valentine’s Day. My husband is a faithful reader of my blog and gets so disappointed when I tell him he can’t read it for a few days.  He is so sweet!  It’s a good thing Valentine’s Day is just around the corner!

I cut a piece of white cardstock 4 x 5 1/4 inches and ran it through my Cuttlebug with the Flourish Impressibilities plate.  I then matted it onto red cardstock that was cut to 4 1/8 x 5 3/8.  I cut a piece of black ribbon, wrapped it around the cardstock and adhered it to the back.  I then took another piece of ribbon, tied it around the ribbon strip and made a bow.  This way I could position the bow exactly where I wanted it.  I stamped the label from Fabulous Frames in L’Amour Red onto white cardstock then die cut and embossed it with the coordinating Labels One die.  I only wanted to stamp a portion of the tree from Love & Laugher onto the frame so I made a mask from a post it note.  This was so easy to do as I just cut the post it note with the die making sure that the sticky portion was on the edge.  After placing the mask, I stamped the tree image in Charcoal ink.  I stamped the sentiments, also from Love & Laughter, in Black and L’Amour Red.  I die cut a piece of red cardstock using the same die, then cut the die in half.  I snipped off the pointy edges on the cut side and adhered them behind my white die cut overlapping the edges evenly so the red only showed at the top and bottom.  I used foam tape to adhere it to the card front.  To finish off the card, I just added three clear gemstones to the ribbon on the left side of my focal point.
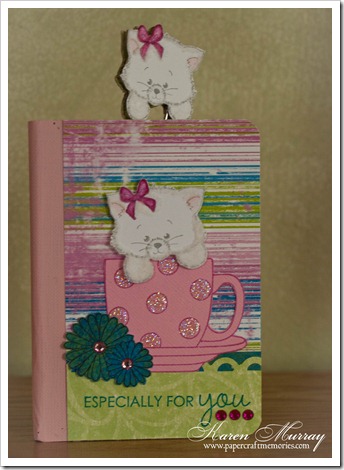
OLYMPUS DIGITAL CAMERASome time ago I purchased some mini composition books and jumbo paper clips at the office supply store.  I painted the spine using acrylic paint that matched this Lilly Anna paper.  I adhered the paper to the cover of the book using my ATG gun and sanded down the edges that overlapped.  I trimmed another piece of Lilly Anna paper to fit the bottom half of the book, punched the edge with a border punch and stamped the sentiment in Beaux Arts Blue ink.  I stamped the tea cup from Cup of Love in Claret ink onto pink Bazzill cardstock.  (Love the texture that it gave the tea cup!)  I added some glitter to those cute polka dots, cut out the tea cup and adhered it to the cover. I stamped the flowers onto the patterned paper and cut them out and overlapped them over the bottom of the tea cup. That adorable kitten image was stamped with Charcoal ink onto white cardstock and I colored just the ears and bow with Copic markers.  I then added white Fun Flock to the edges and the outer ears.  I used foam tape to pop up the kitty over the tea cup.  I made another the exact same way and adhered it to chipboard for the matching bookmark.  I stamped the image on the back of some patterned paper and cut it out, glued the stamped side to another piece of chipboard to make the back side of my bookmark.  I used E6000 glue to adhere them to the jumbo paper clip.

My daughter fell in love with this when she saw it. I sure am glad she likes it since it’s going in her Valentine’s Day package!

Thanks so much for stopping by my blog today!

~Karen


~Supply List~

Sing to the Lord

Stamps- Singing Praises, Happily Grateful

Paper- Kraft cardstock

Ink- Palette Burnt Umber, Moulin Rouge, Versamark Dazzle Frost

Copic markers, glitter, glue pen

Wonderful News

Stamps- Wonderful News, Fabulous Frames

Paper- white cardstock

Ink- Palette Claret, Chartreuse, Cote d’Azure

Labels Four die, glitter, adhesive gems, glue pen, foam tape

I will love you forever

Stamps-Love & Laughter, Fabulous Frames

Paper- white, scarlet cardstocks

Ink- Palette Charcoal, Noir Black, L’Amour Red

Flourish Impressibilities plate, Labels One die, black ribbon, clear adhesive gems, foam tape

Especially for you notebook

Stamps- Cup of Love

Paper- Lilly Anna patterned paper, Bazzill pink cardstock

Ink- Palette Claret, Charcoal, Noir Black, Beaux Arts Blue

Copic markers, glitter, adhesive gems, Cotton Ball White Fun Flock, Apron Lace border punch, chipboard, jumbo paper clip, mini composition notebook, E6000 glue, ATG fun, sanding block, foam tape

Saturday, December 25, 2010

Merry Christmas

Christmas Presence charger

Wishing you and yours a very Merry Christmas!  I pray you enjoy the warmth of love and laughter this day, but most of all that you enjoy His presence for that is what Christmas is really all about.

~Karen

Thursday, December 23, 2010

Christmas Wall Art

MurrayFamilyStockings for blog

I have always admired the wall art that included family names and thought I would make my own in a Christmas theme.  The stocking files are from My Vinyl Designer.  I designed it in SCAL 2 and then flipped the design before cutting it from vinyl.  I then adhered it to the glass so the design would be on the inside of the frame and used some scrapbook paper for the background.  I love the way it turned out and it looks great hanging in my foyer.

Only a few more days until Christmas…it’s so hard to believe.

Have a blessed day!

~Karen

Tuesday, December 14, 2010

Oh So Cute

DSC_2938-Edit Isn’t he just adorable?  This is a very easy and inexpensive gift…a great last minute party gift.  I started with a mason jar and filled it with Hershey kisses then wrapped the snowman I had printed around the jar.  You can find this adorable snowman on Laurie Furnell’s blog here.  (This is actually made to wrap around candy bars but I just trimmed it to fit my jar and when printed on 8 1/2 x 11 paper the 11 inch length is perfect.)  I printed it onto 32lb. glossy presentation paper so it has this really nice sheen to it.  I made the hat and scarf from fleece.  Just wrap the fleece around the jar lid to determine the size, make sure the wrong sides are together and sew the edge.  Turn it to the right side and roll up the edge to make the hat cuff and place it on the jar.  Tie some ribbon around it to create  the  top then cut strips for the fringe and embellish any way you wish.

DSC_2960-EditThis little cutie was even easier.  I just used a ready made die cut that I bought ages ago in a Christmas card kit and adhered it the jar using my tape gun.  I placed a piece of burlap over the lid and screwed on the cap.  I put a foam snowflake sticker on the top and tied some red twill around the cap and embellished it with some bells tied with maraschino baker’s twine from The Twinery.   The  jar is filled with miniature candy canes. 

DSC_2976-Edit We went to New Hampshire this past weekend to celebrate my grandfather’s 90th birthday.  It was so nice to see everyone again.  My dad took us to a house that had these amazing Christmas lights.  I love Christmas lights and this place was amazing.  I have never seen anything like it.  There were lights everywhere including a lighted helicopter on the garage roof. DSC_2906 I had to take a picture of this light “sign” because this is how I feel about Christmas.  Christmas Rocks!  I love Christmas.

DSC_2872 And of course, Christmas wouldn’t be Christmas if it wasn’t for Jesus.  He is the true meaning of the season. 

Hope you are enjoying this Christmas season.

~Karen

Saturday, December 4, 2010

More Vinyled Chargers

DSC_2645-Edit

DSC_2647-Edit

And a plate

DSC_2652-Edit

I hope everyone has a wonderful weekend.  We are taking the kids to the Gingerbread Celebration today.  They are attending the workshop and will get to make gingerbread houses with the chefs.  I love it because there is no mess for me to clean up. :)

Thanks for  stopping by.

~Karen

Tuesday, November 23, 2010

Thankful Am I

OLYMPUS DIGITAL CAMERA

Last year I made an Advent candy jar for my kids.  They were able to eat one chocolate a day until Christmas.  I decided to do a little twist on that idea and make a thankful jar.  I stamped the background and leaf onto white address labels then used my printer to print things that I was thankful for.  I then wrapped them around the chocolates. 

OLYMPUS DIGITAL CAMERA

Here is a picture of the chocolates all dolled up. 

OLYMPUS DIGITAL CAMERA

This picture shows the lid that I stamped and the entire jar.

  All stamps and paper are from The Angel Company. 

Supplies -

Stamps – Speckle, For All Seasons, All Occasion Circles, Happily Grateful

Paper – Olive, Kraft

Ink – Autumn Leaves Kaleidacolor, Versamagic Spanish Olive

Other – raffia, Hershey nuggets, white address labels, Spellbinders classic circles, petite scalloped circles and Labels Four dies, 1 pint canning jar

I entered this in The Angel Company’s So Thankful contest and I just found out that I won!  I am so excited!

Thanks for stopping by my blog today!

~Karen

Saturday, November 20, 2010

Thanksgiving Plates


OLYMPUS DIGITAL CAMERAOLYMPUS DIGITAL CAMERA

OLYMPUS DIGITAL CAMERA Some charges that I embellished with some gold vinyl using SCAL.  I used Michelle’s cornucopia SVG for the cornucopia plate.  All other designs are mine.

Hope you are having a fabulous weekend!

~Karen

Saturday, November 13, 2010

Deck the Halls Blog Hop

TAC Deck the Halls Blog Hop

Welcome to my little spot in The Angel Company’s Deck the Halls Blog Hop.   I made a coaster set using this adorable stamp set Perky Penguins.

TAC penguin coasters 1

These are the first two in the set.  I stamped the images with black Staz-On ink onto ceramic tiles.  I also stamped snowflakes from Ornamental Snowflakes with Brilliance ink.  I then baked them in the oven at 350 degrees for about 30 minutes.  After they cooled, I colored them with Bic Mark-It permanent markers.  I really like using these for tiles as the colors stay so vibrant.  You could probably use Copic markers, but I haven’t tried them for this yet.  I guess I am more comfortable sticking with what I have used successfully in the past.  After coloring them, I baked them again for about 15 minutes.  I then sprayed them with two coats of clear gloss acrylic spray.  I usually use a matte spray on my coaster tiles, but I wanted a little shine to them and this worked perfectly.

TAC penguin coasters 2

Here are the other two coasters in the set.  You can see the snowflakes a little better in this picture.  For the snowflakes, I used Brilliance Platinum Planet and Moonlight White ink.   I then added some felt to the bottom of the tiles so they would not scratch any surfaces.  It also adds a really nice finished look to them.

TAC penguin coasters packaged

Here they are all bundled up ready for gift giving.  I just wrapped some Baker’s twine a couple times around them and tied it in a little bow.  I love how cute they turned out.

Be sure to stop by The Savvy Projects Blog to see the full list of participants.

Thank you so much for stopping by my blog today!

~Karen

Saturday, October 30, 2010

The Right Pair of Shoes

OLYMPUS DIGITAL CAMERA

I saw a tile like this on the Cricut board a while ago and had to make my own version of it.  In pink, of course!  I designed the file in SCAL.

Have a  wonderful weekend!

~Karen

Saturday, October 23, 2010

Anything But A Card

OLYMPUS DIGITAL CAMERA

Isn’t this saying just beautiful?  After 22 years of marriage, this is still the way I feel about my husband. 

This is a 6 inch tile that I made.   I used SCAL 2 to cut the vinyl from an SVG file I purchased from My Vinyl Designer.

Have a wonderful weekend!

~Karen

Saturday, October 16, 2010

Anything But A Card

OLYMPUS DIGITAL CAMERA

It’s that time of year when we start thinking about Christmas gifts, so I thought I would use Saturday blog posts to share some gifts that I have made.  This is a dinner plate  that I vinyled.  I created this design using SCAL 2 software and cut the vinyl with my Cricut Expression.  I think this would make a wonderful Christmas gift, what do you think?

Have a blessed weekend!

~Karen

Tuesday, September 14, 2010

Philippians 4:8 WORDart

I am finally back with some new WORDart.  I wanted to do something different than a card with this verse, so I pulled out this $1 frame that I purchased at Michael’s ages ago.

OLYMPUS DIGITAL CAMERA

I spray painted the wood with Krylon Brushed Metallic spray paint in Champagne then modpodged the paper onto the front.  After changing the color of the WORDart to match my paper, I printed it onto vellum and placed a coordinating piece of paper behind it.

I am SO proud of the flower I made using a tutorial I came across on YouTube.  I made the leaves using the same concept.  I had so much fun making them and I am so excited about the way they turned out. I thought I saved the link to share with you but I can’t find it.  If I can find it again, I will edit this post.

Here is a close-up view.

OLYMPUS DIGITAL CAMERA

As always the WORDart is available for free.  You can download it HERE.

Have a blessed day!

Thursday, July 29, 2010

Papertrey Organization

Updated link to Papertrey ink matches--Updated 2/23/11 
OLYMPUS DIGITAL CAMERA
I have been wanting to do this for such a long time and I finally finished it.  I made a book with samples of all my Papertrey cardstock with the inks that I own that match.  The pages are 5 x 5 and include all of the cardstock Papertrey carries.  I stamped a sample of the inks both on the cardstock itself and on white so I could see how it affected both papers.  I labeled each ink color as well as the cardstock with my label maker and clear label tape.  I also stamped a flourish in the corner with Versamark so I could see how that looked on the cardstock as well. 
Here is a look at the inside.  I used my Bind It All to bind it so I can add new pages easily.
OLYMPUS DIGITAL CAMERA
I created a file to store all of this info on one sheet so I could keep it in a binder and print it out to carry with me.  I have compiled it based on my own research as well as what I have read on the PTI forum.  The inks that I have not personally proven are marked with an *, darker colors with a (D) and lighter colors with a (L).  If you are interested in using it as well, I have made it available to download. 
Papertrey Color Matches as of  2/23/11  Download HERE.
Papertrey Copic and Prismacolor matches as of 7/2010 Download HERE.
I hope you find this helpful.  If you share this information, please direct people to my blog and not directly to the link.  Thanks so much!
Have a blessed day!

Thursday, January 14, 2010

Christmas Rewind – Framed Monograms

Ok, this is it.  After this post, I am officially finished posting Christmas gifts. 
Dustin & Karissa monogram Kramer monogram paul & rachel monogram schultz monogram
I had so much fun making these.  Once again, I used my Cricut. The designs were purchased from www.myvinyldesigner.com.  I love my Cricut!
I hope I didn’t bore you too much with Christmas gifts.  I know people have moved on to Valentine’s day already.  I still have my Christmas tree up…can’t seem to find the time to take it down.  It’s weird, you know.  You can’t find the time to put it up and then you can’t find the time to take it down.  Am I the only one?  Guess what I’m doing this weekend?!?! 
Have a great day.  Take time to be thankful!

Tuesday, January 12, 2010

Christmas Rewind – Personalized Mugs

What do you give teenagers for Christmas?  That was my biggest question.  I was at a loss about what to give my nieces and nephew for Christmas.  Then I thought of etching mugs with their names and filling them with marshmallows, hot cocoa mixes and candy canes. 

filled etched mug

This is what they look like filled.  I packaged them really cute, but of course, I forgot to take a picture.  Here are some up close shots of the mugs.  It’s very hard to get a picture of etched glass, but I think I did ok…not perfect, but you get the idea.

Caleb etched mug  Tamryne etched mug Mekaila etched mug

I used my Cricut to cut the names out of contact paper and then used etching cream.  I left the etching cream on for 30 minutes.  I find leaving it on that long worked pretty well for me.  They were really excited about them, so I knew my little idea was a success.  That’s a really nice feeling.

Thanks for stopping by, have a blessed day!