Showing posts with label TAC. Show all posts

Thursday, October 6, 2011

Psalm 121:1-2 WORDart

OLYMPUS DIGITAL CAMERA

This is a card I made with today’s WORDart.  I know, I know, I actually made a card!  I used a stamp from The Angel Company’s Mountain Scenery set.  It was the closest stamp I had to hills.  I stamped it in Palette Noir then restamped it without reinking above it.  I used the leaf border die to die cut Ripe Avocado cardstock and adhered it to my card using a glue pen, then wrapped some Honeydew baker’s twine from The Twinery around it.  The WORDart was printed directly onto the kraft card base first before I did all the above. ;) 

You can download the WORDart here.

As always, I would love to know what you think or any suggestions you may have and I would love to see what you create with the WORDart.

Have a blessed day!

~Karen

Thursday, August 25, 2011

Jeremiah 17:7 WORDart

I don’t have a card this week, but I do have some new WORDart for you.  

Jeremiah 17_7

I am so thankful for the hope I have in the Lord!  Have you ever had a time in your life when just nothing seemed to be going right?  Well, I will be a little transparent here and tell you that is the way things have been going for me lately.  It just seems like it is one thing after another…one problem is solved only to move on to the next one.  Computer issues…car troubles…health issues…can I catch a break, please!  But then I stop and realize just how blessed I am.   My hope does not come from earthly things, but my hope is in the Lord who gives me strength for everything, however big or small.  I think maybe God is trying to teach me that I need to just trust in Him and not stress so much.  I am so thankful for the word of God that speaks to my heart and encourages me and for the hope I have in the Lord.

You can download this WORDart here.

I want to thank everyone who has taken the time to leave me a comment or send me an email recently.  I can not tell you how much that has meant to me!  It means more than I can say and was the perfect encouragement at the perfect time.  God is so good!

I also want to thank everyone who has supported and/or purchased from my side hobby, The Angel Company.  The Angel Company has decided to close effective immediately.  It makes me sad and I will very much miss being a part of  The Angel Company.

My husband will be having surgery next week, so if things are quiet here it is because I am taking care of my family.   If I can squeeze in some computer time between caring for him and homeschooling the kiddos, I will have some new WORDart  for you.  If I can squeeze in some crafty time, I might even have a card!  I would really appreciate your prayers for a speedy recovery for my husband and strength for our family.

May God richly bless your day!

~Karen

Tuesday, June 7, 2011

Congrats!…and Scrap Storage

Hello!  Just thought I would share this anniversary card I made using “For My Tweetie” by The Angel Company.  I love these little birds, they are just too cute.  I colored them with prismacolor pencils and gamsol.

OLYMPUS DIGITAL CAMERAI always try to use my scraps whenever possible, so this card with the exception of the card base uses all scraps.  

Speaking of scraps, I thought I would share with you how I store mine.OLYMPUS DIGITAL CAMERAI think I purchased these at Staples or Walmart.  I store all of my Papertrey paper scraps that are smaller than a card base in these.  I have two of them.   They close up to a nice compact size that I can easily store by my desk.

OLYMPUS DIGITAL CAMERA I separate all the colors with an 8 1/2 x 11 piece of cheap white cardstock so I can fit more in them.  I always check my scraps first to see if I have the color that I need, which really cuts down on the amount of scraps I have to store.  I have found this to really work well for me.   For my other scraps, I throw them in drawers marked Textured Scraps, Metallic Scraps, Patterned Paper, TAC Scraps.  Since I mostly use Papertrey, the drawers work well for everything else.

Thanks for stopping by my little blog today.  I plan to be back on Thursday with new WORDart.  I hope to “see” you then.

~Karen


Supplies used for card~

Stamps- For my Tweetie (The Angel Company), Tiny Tags (Papertrey)

Paper- Hawaiian Shores, White (PTI), green (Bazzill), pp (MME Magnolia)

Ink- Noir (Palette), Pure Poppy (PTI)

Dies- Eyelet Lace border die, Angled Labels die, Tiny Tags die (PTI), Rectangle Nestibilities die (Spellbinders)

Other- Orange and Green Apple Divine Twine, prismacolor pencils

Thursday, February 10, 2011

Some Angel Company Love

Some time ago, before the sickness marathon in the family, I received my order of stamps from The Angel Company that I got with my contest winnings.  Well I spent an afternoon and went on a stamping frenzy, here is what I created.
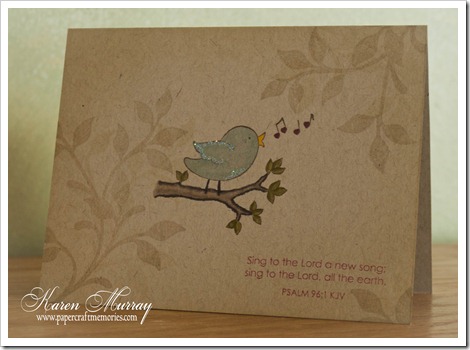
OLYMPUS DIGITAL CAMERA I tried my hand at a one layer card.  I started with a kraft base and stamped the little bird image from Singing Praises in Burnt Umber.  I colored it with Copic markers and because I can’t seem to make a card without some bling, I added some glitter to his wing and belly.  The sentiment from the same set is stamped in Moulin Rouge.  I stamped the leaves from Happily Grateful in Versamark Dazzle Frost ink and sponged all the edges using Haystack ink. 

OLYMPUS DIGITAL CAMERAI LOVE the way this card turned out.  The colors and the swirls just make me so happy.  I used the long swirl image from Wonderful News.  This stamp is such a great size for cardmaking.  It is long enough to stamp the entire length of the card with room to spare so you don’t have to worry about whether it is fitting right.  I heart effortless stamping.  I used Claret, Chartreuse and Cote d’Azure inks and alternated the colors saving Claret for the middle.  I die cut and embossed a piece of white cardstock with a Labels Four die and then stamped the coordinating stamp from Fabulous Frames in Chartreuse.  I stamped the sentiment from Wonderful News in Cote d’Azure ink and used a glue pen to add glitter to the embossed area of the die cut, added some pink gems and adhered it the my card with foam tape.

OLYMPUS DIGITAL CAMERA I made this card for my husband for Valentine’s Day. My husband is a faithful reader of my blog and gets so disappointed when I tell him he can’t read it for a few days.  He is so sweet!  It’s a good thing Valentine’s Day is just around the corner!

I cut a piece of white cardstock 4 x 5 1/4 inches and ran it through my Cuttlebug with the Flourish Impressibilities plate.  I then matted it onto red cardstock that was cut to 4 1/8 x 5 3/8.  I cut a piece of black ribbon, wrapped it around the cardstock and adhered it to the back.  I then took another piece of ribbon, tied it around the ribbon strip and made a bow.  This way I could position the bow exactly where I wanted it.  I stamped the label from Fabulous Frames in L’Amour Red onto white cardstock then die cut and embossed it with the coordinating Labels One die.  I only wanted to stamp a portion of the tree from Love & Laugher onto the frame so I made a mask from a post it note.  This was so easy to do as I just cut the post it note with the die making sure that the sticky portion was on the edge.  After placing the mask, I stamped the tree image in Charcoal ink.  I stamped the sentiments, also from Love & Laughter, in Black and L’Amour Red.  I die cut a piece of red cardstock using the same die, then cut the die in half.  I snipped off the pointy edges on the cut side and adhered them behind my white die cut overlapping the edges evenly so the red only showed at the top and bottom.  I used foam tape to adhere it to the card front.  To finish off the card, I just added three clear gemstones to the ribbon on the left side of my focal point.
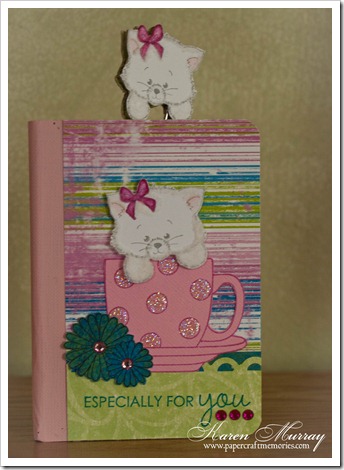
OLYMPUS DIGITAL CAMERASome time ago I purchased some mini composition books and jumbo paper clips at the office supply store.  I painted the spine using acrylic paint that matched this Lilly Anna paper.  I adhered the paper to the cover of the book using my ATG gun and sanded down the edges that overlapped.  I trimmed another piece of Lilly Anna paper to fit the bottom half of the book, punched the edge with a border punch and stamped the sentiment in Beaux Arts Blue ink.  I stamped the tea cup from Cup of Love in Claret ink onto pink Bazzill cardstock.  (Love the texture that it gave the tea cup!)  I added some glitter to those cute polka dots, cut out the tea cup and adhered it to the cover. I stamped the flowers onto the patterned paper and cut them out and overlapped them over the bottom of the tea cup. That adorable kitten image was stamped with Charcoal ink onto white cardstock and I colored just the ears and bow with Copic markers.  I then added white Fun Flock to the edges and the outer ears.  I used foam tape to pop up the kitty over the tea cup.  I made another the exact same way and adhered it to chipboard for the matching bookmark.  I stamped the image on the back of some patterned paper and cut it out, glued the stamped side to another piece of chipboard to make the back side of my bookmark.  I used E6000 glue to adhere them to the jumbo paper clip.

My daughter fell in love with this when she saw it. I sure am glad she likes it since it’s going in her Valentine’s Day package!

Thanks so much for stopping by my blog today!

~Karen


~Supply List~

Sing to the Lord

Stamps- Singing Praises, Happily Grateful

Paper- Kraft cardstock

Ink- Palette Burnt Umber, Moulin Rouge, Versamark Dazzle Frost

Copic markers, glitter, glue pen

Wonderful News

Stamps- Wonderful News, Fabulous Frames

Paper- white cardstock

Ink- Palette Claret, Chartreuse, Cote d’Azure

Labels Four die, glitter, adhesive gems, glue pen, foam tape

I will love you forever

Stamps-Love & Laughter, Fabulous Frames

Paper- white, scarlet cardstocks

Ink- Palette Charcoal, Noir Black, L’Amour Red

Flourish Impressibilities plate, Labels One die, black ribbon, clear adhesive gems, foam tape

Especially for you notebook

Stamps- Cup of Love

Paper- Lilly Anna patterned paper, Bazzill pink cardstock

Ink- Palette Claret, Charcoal, Noir Black, Beaux Arts Blue

Copic markers, glitter, adhesive gems, Cotton Ball White Fun Flock, Apron Lace border punch, chipboard, jumbo paper clip, mini composition notebook, E6000 glue, ATG fun, sanding block, foam tape

Friday, January 21, 2011

Kona Kid Krafter’s Challenge Blog

OLYMPUS DIGITAL CAMERA

My daughter and I recently discovered a kid’s challenge blog for kid crafters called Kona Kid Krafter’s.  They have challenges twice a month on the 1st and the 15th for kids ages 2ish-17.  The current challenge is “Anything Goes/Optional add wings”.  Keandra went through all of my stamps and decided to settle on this one, Butterfly Swirls by The Angel Company.  She colored it with Prismacolor pencils and Gamsol and colored the background with shimmer chalk.  She then raided my box of bling, because she thinks any card without bling is just not complete.   She also used a glue pen to add some glitter to the butterfly and some of the swirls.   She did everything herself, but she did ask for my assistance to cut her paper straight and tie the bow.   I think she did a pretty good job!

Tuesday, November 23, 2010

Thankful Am I

OLYMPUS DIGITAL CAMERA

Last year I made an Advent candy jar for my kids.  They were able to eat one chocolate a day until Christmas.  I decided to do a little twist on that idea and make a thankful jar.  I stamped the background and leaf onto white address labels then used my printer to print things that I was thankful for.  I then wrapped them around the chocolates. 

OLYMPUS DIGITAL CAMERA

Here is a picture of the chocolates all dolled up. 

OLYMPUS DIGITAL CAMERA

This picture shows the lid that I stamped and the entire jar.

  All stamps and paper are from The Angel Company. 

Supplies -

Stamps – Speckle, For All Seasons, All Occasion Circles, Happily Grateful

Paper – Olive, Kraft

Ink – Autumn Leaves Kaleidacolor, Versamagic Spanish Olive

Other – raffia, Hershey nuggets, white address labels, Spellbinders classic circles, petite scalloped circles and Labels Four dies, 1 pint canning jar

I entered this in The Angel Company’s So Thankful contest and I just found out that I won!  I am so excited!

Thanks for stopping by my blog today!

~Karen

Saturday, November 13, 2010

Deck the Halls Blog Hop

TAC Deck the Halls Blog Hop

Welcome to my little spot in The Angel Company’s Deck the Halls Blog Hop.   I made a coaster set using this adorable stamp set Perky Penguins.

TAC penguin coasters 1

These are the first two in the set.  I stamped the images with black Staz-On ink onto ceramic tiles.  I also stamped snowflakes from Ornamental Snowflakes with Brilliance ink.  I then baked them in the oven at 350 degrees for about 30 minutes.  After they cooled, I colored them with Bic Mark-It permanent markers.  I really like using these for tiles as the colors stay so vibrant.  You could probably use Copic markers, but I haven’t tried them for this yet.  I guess I am more comfortable sticking with what I have used successfully in the past.  After coloring them, I baked them again for about 15 minutes.  I then sprayed them with two coats of clear gloss acrylic spray.  I usually use a matte spray on my coaster tiles, but I wanted a little shine to them and this worked perfectly.

TAC penguin coasters 2

Here are the other two coasters in the set.  You can see the snowflakes a little better in this picture.  For the snowflakes, I used Brilliance Platinum Planet and Moonlight White ink.   I then added some felt to the bottom of the tiles so they would not scratch any surfaces.  It also adds a really nice finished look to them.

TAC penguin coasters packaged

Here they are all bundled up ready for gift giving.  I just wrapped some Baker’s twine a couple times around them and tied it in a little bow.  I love how cute they turned out.

Be sure to stop by The Savvy Projects Blog to see the full list of participants.

Thank you so much for stopping by my blog today!

~Karen

Wednesday, November 10, 2010

Matthew 2:10 WORDart card

Matthew 2_10 WORDart card I was finally able to finish my WORDart card for this week.  So sorry for the delay.  I will have a bunch of new things to share with you soon, so hopefully that will make up for it. 
I used Perky Penguins by The Angel Company.  They are soooo adorable.  I used Prismacolor pencils to color it.  I made a little snowbank for him with glitter and then used a glue pad to make the glitter snowflakes.  A touch of yellow Stickles made that little star sparkle.   The snowflake border was made by using the Snowflake trim punch and white glitter paper that looks amazing in real life but doesn’t show up in the picture at all…so disappointing.  
Supplies
Stamp – Perky Penguins by The Angel Company,  Matthew 2:10 WORDart by Karen
Ink – Momento  Tuxedo Black
Paper – kraft, white,  new leaf, paper from my Christmas stash, white glitter paper (DCWV)
Other – Labels One and Labels Four dies (Spellbinders), blue adhesive gems, The Essential Glue Pad (Tsukineko), snowflake trim punch (Martha Stewart), shimmer chalk, yellow Stickles, glitter
I pray your day is a blessed one!
~Karen

Thursday, November 4, 2010

Some Girly Birthday Cards

Catelynn Girlz birthday My daughter’s friend was having a birthday so we had some mother/daughter card making time.  We both used stamps and paper by The Angel Company.   My card uses the Girlz & Boyz stamp set and hers the Mini Joy Limited Edition stamp.  We both used the Catelynn paper. Isn’t is beautiful?  I love it!

keandra card for brooke

I think she did a great job, although the photography needs a little work.   She will far surpass me before too long. 

Thanks for stopping by!

~Karen

Thursday, September 9, 2010

A Robot Birthday

Monday my son turned 14 years old!  Time goes so fast.  This is the card I made for him.  I used the stamp set Robots from The Angel Company and colored it with Prismacolor pencils and gamsol.  The background was made the the solid outline stamp from “A Little Argyle” stamped in Spring Rain. I overlapped the edges just a bit and used a silver metallic Sharpie marker to make a dot where the lines connected.

OLYMPUS DIGITAL CAMERA

Here is the inside using another robot from the same set also colored with prismacolors. The sentiments are from the set as well. 

OLYMPUS DIGITAL CAMERA

I have been working on some new WORDart and hope to have it ready for next Tuesday and be back on my old blogging schedule.  It’s so nice to be back in a routine.  I feel like I am finally getting things accomplished.  Such a nice feeling!

Have a blessed day!

Saturday, February 13, 2010

Valentine’s cards

Here are a few more cards I made for my kiddos for Valentine’s day.  I love Valentine’s Day and I love making it special for my family.  They have been trying to learn my secrets about what I have planned for that day for a little while now.  I love keeping them in suspense.  We are celebrating on Monday since we have the day off from school and Sundays are such busy days for us.  So, what do you do with your family for Valentine’s?  Do you do anything special or have any special traditions? OLYMPUS DIGITAL CAMERA

The image on this card is from The Angel Company.  I colored it with Copic markers.  The patterned paper is from Sizzix that I have had for a very long time.  The sentiment is from Studio G. 

OLYMPUS DIGITAL CAMERA

The image on this card is from Stampin Up’s Nice & Easy Notes set.  I also colored it with Copic markers.  The sentiment is also from Studio G.  The paper is some that I have had forever and I don’t know the manufacturer.  When I first started buying patterned paper I would store it by color and not by manufacturer.  Now I have all this paper that I have no idea who made it, but I am having fun using my stash of supplies.  I haven’t bought any new craft supplies in 2010, so I am doing really well with my goal.  I haven’t even walked into a craft store (if I did it would all be over.)  I am not sure how much longer I can hold out though.  I am seeing some really great new punches on some blogs.  That would definitely be my weakness. 

Have a great weekend!

I have a thing for you card

Stamps girlz & boyz (TAC), sentiment (Studio G Series 29)
Paper New Leaf, White (PTI), pp (Little Sizzles Rainbow by Sizzix)
Ink Palette Noir, Pure Poppy
Accessories ribbon (Offray), button (PTI), red Scrapper’s Floss, heart stickers, mini hearts border punch (MS), classic and scalloped rectangle nestibilities, Copic markers


I love you this much card

Stamps Nice & Easy Notes (SU), sentiment (Studio G Series 29)
Paper Pure Poppy, White (PTI), pp from stash
Ink Palette Noir, Enchanted Evening, Colorbox Chalk creamy brown
Accessories enchanted evening twill ribbon (PTI), brad, classic and scalloped square nestibilites, Copic markers

Thursday, February 11, 2010

More Snow Pics and some cards

So, it is official.  We have broken the record for the most snow in PA in the month of February.  I don’t even know how much snow we got…just that it is a lot of snow.

Here are some pictures from my front door.  They had to abandon the snow blower and use the shovel to clear the walkway because the snow was higher than the snow blower.

OLYMPUS DIGITAL CAMERA

I thought these snow drifts were so pretty.  They remind me of dessert pictures I have seen, but instead of sand, it’s snow.

OLYMPUS DIGITAL CAMERA

My son, Marcus and our dog, Peanut, standing in the path they were shoveling.  You can really see how high the snow is in relation to him.

OLYMPUS DIGITAL CAMERA

And, finally, some cards that I found time to make while being snowed in.OLYMPUS DIGITAL CAMERA

This is the card I made for my youngest daughter for Valentines day.  The stamp and patterned paper are from The Angel Company.  The sentiment is from Verve.

OLYMPUS DIGITAL CAMERA

I made this card for one of my sons.  The stamp is the same stamp set from The Angel Company.  The patterned paper was from my stash of scraps and I think it is DCWV.  The sentiment is also from Verve.

Take the time to hug your kids today.  My son’s friend was killed in a car accident this past weekend and it has left such a whole in my heart.  He felt like part of our family and we will miss him so much.  

Thursday, January 28, 2010

Fall in Chocolate

OLYMPUS DIGITAL CAMERA

I fell in love with this sentiment the moment I read it.  It is a studio G stamp that I purchased last year.  My card was totally built around this sentiment.  I used Dark Chocolate as my base.  I stamped the Cooking Background stamp in Versamark and embossed it with clear embossing powder.  (The little sparkly flecks you see are some glitter that I somehow managed to get in my clear embossing powder.)   The pink layer is Prism cardstock.  I used the MS Valentine lace border punch to make the border.  The sentiment is stamped in Dark Chocolate.  The cupcake image is from The Angel Company.  I colored it with Copics and added glitter to the hearts.  The ribbon is some I have had forever and I am not sure where I purchased it or who makes it. 

OLYMPUS DIGITAL CAMERA

On the inside of the card, I used the same pink cardstock.  The sentiments are by Craft Affair from the Life is Sweet set and are stamped in Dark Chocolate.

Keeping it short and sweet today.  Thanks for stopping by.

Have a blessed day!

Stamps Cooking Background (Great Impressions), Sweet Thing (TAC), sentiment (Studio G Series 29), Life is Sweet (Craft Affair)
Paper Dark Chocolate, White (PTI), pink (Prism)
Ink Versamark, Dark Chocolate
Accessories clear embossing powder, ribbon (stash), Copics, diamond dust glitter, cell phone bling, MS Valentine Lace border punch, Marvy scalloped circle punch, SU slot punch

Thursday, October 22, 2009

Use It or Lose It -- Paint Dabbers

My craft room overfloweth with neglected craft materials. How about yours? I have so many items in my craft room that I have purchased because I was absolutely sure that I "needed" them. Most of them were in my beginning stages of crafting when I was easily convinced by products I saw or heard (or read) about. My craft funds have pretty much dried up, so I am at the place where I either rediscover what I already have or I need to sell it to buy something new. So, I have challenged myself to use it or lose it. This week I chose to use my Paint Dabbers that I put on my Christmas list two years ago. Quite honestly, I haven't really used them all that much. In fact, most of them were dried up and I had to resurrect them. Thankfully, this was quite easy to do.

They are easily thinned with water, so I took the cover off and put just a few drops of water in the bottle and mixed it with a craft stick. I used the craft stick to "dig" all of the dried out paint that was in the top and put it back in the bottle and mixed it in. Shake it up really good, it should be of the consistency to shake. The tops were also dried out, so I ran hot water in my kitchen sink and dabbed the paint dabber in the water in the sink until the paint loosened up. They worked like new again.

I really had a lot of fun playing with these and made all kinds of accessories as well as cards. I will share with you what I did. You can click on the pictures to view them larger.

I found they work great on raw chipboard. The daisy flower was painted with the dabbers. You can put glitter on the paint while it is still wet and it will stick really well. I really like this look. I also did this with the white tag. I painted it white, then added glitter to the wet paint. I painted a fabric flower purple. It also works pretty well on coated chipboard, I just needed to used two coats. I love the look of the metallic paints on raw chipboard (the tags). The pearl is so pretty and dried with a crackle look. I used the paint on some fabric leaves that come on silk plants that you can buy at craft stores. I dabbed some copper on one, gold on one and some red pepper on another. I also tried it on acrylic, you can get different looks depending on how much you apply. If you paint on the back you can stamp with Staz-On on the front. I also love the look of edging with the paint dabbers.
On this card I used the acrylic that comes with the Papertrey stamps and cut it with nesties in my BigKick machine. The Labels One die is stamped on the front with Staz-On and I dabbed some Copper paint on the back of the stamped section and around the edges. I then ran it through the BigKick with the swiss dot embossing folder.

The Designing D.I.V.A.S. are having a Secret Sister challenge right now to make lollipop flowers, which I had never heard of before, but it sounded interesting and I checked out the links. Super cool, I just had to try it. In the tutorial, she used alcohol inks but I wanted to try it with the paint dabbers. After I cut the acrylic circles from Petite circle nesties, I ran them through the BigKick with the tiny bubbles embossing folder. I then used the red pepper and butterscotch paint dabbers on the front and copper on the back and edges. I used my heat gun to melt the acrylic circles. I held the circles together and used the Crop-a-dile to punch a hole in the center and used a brad to hold them together. I really like the way it came out. I don't like this card, but I love the flower. lol You can find the tutorial I used here.
For this card, I used the Aqua paint dabber to paint a background for my stamps. The stamp is from the All Things of Nature set by The Angel Company. I stamped it with Broken China Distress ink. The sentiment and the music notes are from the Birds of a Feather Set by Papertrey and are stamped in the same ink. The bling in the corner is clear bling colored with Stream alcohol ink. For some reason, this picture makes them look like they are embedded. Weird.
I used the paint dabbers as my background again on this card, but I used watercolor paper. I stamped the image from Spiral Bouquet (Papertrey) in Aged Mahogany Distress Ink on top of the lettuce background. I tore the paper and inked the edges with Shabby Shutters Distress Ink and the blending tool. I added some clear bling to the flowers and matted it onto Scarlet Jewel paper and adhered it to the Spring Moss card base. The sentiments are also stamped with the Aged Mahogany ink.
Here I used the cranberry paint dabber to ink my stamp. The stamp is a retired stamp set from The Angel Company called Partridge. I stamped it onto a plain manila shipping tag, then blended Old Paper distress ink onto it with the blending tool. I wrapped some twine around the end and put some ribbon through the tag hole and secured it with a button threaded with twine. I matted it onto Wassail paper from Basic Grey. The edges of the paper are distressed with a distressing tool and inked with Colorbox Creamy Brown ink. The paper is then matted onto Olive paper (TAC). My husband adored this card and snatched it to give right away. What a compliment!

So, the verdict. I really had so much fun playing with these and now that I have spent so much time playing with them, I have all kinds of ideas. I am going to keep them and keep playing.

I want to share one more thing with you. I have made this chart that I keep in a binder to keep track of the colors I own. I have done this with almost all of my craft supplies. It is a really nice reference tool when I am looking for a certain color. I can look through my binder and see all of the different products and colors that I have.
This isn't the best picture, but I think you get the idea. If you are interested in a chart like this, feel free to email me and I will send you the file I made. It includes all of the colors (except the metallics which I will add) so I can easily add the other colors if I choose to purchase them.

I know this was a really long post. I hope you found it informative and maybe it even challenged you to use the paint dabbers you own or something else you have neglected. I would love to hear how you use paint dabbers or see something you made with them, please leave a link in the comment section and let me know.

Have a blessed day!

Tuesday, October 20, 2009

Pink Penguin

I bought this set last year and am just now getting around to using it for the first time. It is called Perky Penguins and is by The Angel Company. I colored the image with Copic markers and die cut it with a Label 4 die. The card base is Raspberry Fizz and the patterned paper is from DCWV Christmas stack (last year). I matted it onto a piece of Ripe Avocado and punched the bottom with the Fiskars Upper Crest border punch. I wrapped a piece of silver organza ribbon from my stash around the main piece and tied the sentiment with floss. The tag is white chipboard cut from the Sizzix mini tags die and "colored" pink by rubbing a Versamagic Pink Pixie ink pad over it. The sentiment is also by The Angel Company from a set called Tag Tidbits. To finish it off, I added some pink bling to the points of the main image and the points of the border. I just love the way the Label 4 dies and the Fiskars Upper Crest border punch compliment each other.
On the inside of the card, I did my new favorite thing and that is to stamp the same image as the focal point on the front on the inside with Versamark. I just love this look. It is light enough so you can still write over it, but it really makes a statement and livens up the inside of the card.

Thanks so much for stopping by today. Have a blessed day!

Supplies
Stamps-Perky Penguins, Tag Tidbits (The Angel Company)
Paper-Raspberry Fizz, Ripe Avocado, White (PTI), Christmas stack (DCWV)
Ink-Palette Noir, Versamagic Pink Pixie, Ripe Avocado
Other-Labels 4 die, Fiskars Upper Crest border punch, Sizzix Mini tags die, silver organza ribbon, floss, bling, copics

Tuesday, September 15, 2009

Happy Trails

I found a couple of minutes to stamp last week and made this card with the Happy Trails set by The Angel Company. I stamped the horseshoes in Versamark on Kraft paper and stamped the horse in Burnt Umber ink on Rustic Cream. The patterned paper is Basic Grey Granola and I matted it onto brown cardstock. The sentiment from Forever Friends is also stamped in Burnt Umber on Rustic Cream. I used a Labels One die to cut it and then cut it in half and tied twine around it. I added a button for the finishing touch.

Thanks so much for stopping by. Have a blessed day!

Supplies
Stamps-Happy Trails, Forever Friends (The Angel Company)
Paper- Kraft, Rustic Cream, brown, blue (Bazzill) Granola (Basic Grey)
Ink-Burnt Umber, Versamark
Other-twine, button, classic and scalloped square nestiblilities, Labels One die

Saturday, August 22, 2009

Love & Laughter Anniversary

Happy Saturday! I am so glad for the weekend, even tho I am spending most of the day cleaning my poor neglected house. It has been such a busy week with VBS every day and getting ready to start school on Monday. I'm afraid I haven't had much time for blogging or internet time. I am really looking forward to getting back into our routine.

This card I made for a special couple. I woke up one morning totally inspired by Melon Berry and Dark Chocolate. I guess I must have been dreaming about it:). I started with Dark Chocolate cardstock as my base and stamped the large damask stamp from Damask Designs in Versamark. I then matted a strip of Melon Berry Green Tea Leaves paper to Spring Moss cardstock and adhered it to the left side of my card. I stamped the tree from Love & Laughter and the sentiment from Damask Designs onto Melon Berry cardstock in Burnt Umber ink making sure to leave enough room to tie my Spring Moss satin ribbon. I cut both the image and the mat with rectangle nestibilities. I tied the Spring Moss ribbon around the cardstock and matted it to Spring Moss cardstock. I then adhered the image to my base with foam tape.
On the inside, I stamped the same tree image in Versamark onto Melon Berry cardstock and the sentiment from the set is stamped in Burnt Umber. I added a strip of the same Melon Berry Green Tea Leaves paper that I used on the front and used a ruler and a brown pen to draw lines. I love how simple this card is and the way these colors work together.

It is almost time for KLM Design sneak peeks. I should be back on Tuesday for the first one. They are looking for a new design team, if you're interested be sure to apply. The details can be found here. They are a really great company to work for.

Thanks so much for stopping by. Have a blessed day!

Supplies-
Stamps-Love & Laughter (The Angel Company), Damask Designs (Papertrey)
Paper-Dark Chocolate, Melon Berry, Spring Moss, Green Tea Leaves
Ink-Versamark, Burnt Umber (Palette)
Accessories-Spring Moss satin ribbon, brown pen (Staedtler)
, rectangle nestibilites

Monday, July 6, 2009

KLM Designs: Release Day

This cute little guy is Ryan the Frogcatcher and he is available today at KLM Designs. I colored him with prismacolor pencils and OMS. I added a little bit of shading with blue shimmer chalk. I die cut the image with a classic rectangle nestie and matted it onto Navy cardstock die cut with a scalloped rectangle nestie. The background paper is Just Like Dad from The Angel Company. For the horizontal strip I matted the patterned paper onto navy cardstock that I punched with a border punch and then a added a strip of Magic Mesh that I have had in my stash forever. The "Happy Birthday" sentiment is also part of this release and comes with Ryan. I printed it out and then cut it with a double ended tag die. I punched two pieces of navy cardstock with a 1/8 inch hole punch and then punched them again with a 1/2 inch hole punch to get those cute little circles on the tag. I then put my brads through the holes of the circles and the die cut and adhered the sentiment to my card with foam tape. The main image is also mounted with foam tape. Don't forget to stop by KLM Designs today to check out the new releases.

I hope everyone had a wonderful weekend! We had a very relaxing, non-stressful day just hanging out at home as a family. I cooked steak on the grill and made homemade potato salad and we went to the farm stand and picked up some fresh corn on the cob and a watermelon. I cut up some fresh strawberries and blueberries and we put cream on top--my red, white and blue dessert. It was a big hit with the kids. It sure was yummy. We were so full we never even cut the watermelon. I am really looking forward to that. It is one of the biggest watermelons I think I have ever seen. The kids insisted we had to buy THAT one. It's a good thing they weren't charging by the pound! That thing weighs a ton.

Have a blessed day and thanks for stopping by.

Supplies
Stamps-Ryan the Frogcatcher (KLM Designs)
Paper-Papertrey White, Navy, Just Like Dad (The Angel Company)
Embellishments-brads (Pink Hedgehog Paper Crafts), Magic Mesh
Tools-EK Success border punch, 1/8" & 1/2" hole punches, double ended tag die, classic and scalloped rectangle nestibilities (Spellbinders), prismacolor pencils, OMS, shimmer chalks

Friday, July 3, 2009

TAC Happenings

The new Angel Company promotions are up. Be sure to check them out by clicking on the links on the right sidebar under The Angel Company logo. Don't forget to enter to win The Lilly Anna Package. It's a great prize with the complete Lilly Anna collection, the new Toodles stamp set and the newest catalog.

Friday, June 26, 2009

Clean & Simple Challenge

The Clean & Simple Challenge on SCS this week is paper piecing. I chose to use this set from The Angel Company called Sweet Thing. I stamped the image in Palette Noir ink then embossed around it with a Square nestibilities die. The paper for the cupcake holder is from my stash and the paper for the cherry is Bitty Star Basics. I traced all the lines with Stardust Stickles. The Happy Birthday sentiment is from Sentiments, a retired set from The Angel Company.

I hope everyone has a wonderful weekend. We are going to the Fireman's Carnival tonight. The kids are so excited. Fireworks at 11pm...I sure hope I can stay awake that long. One thing is for certain, I will definitely wake up when they start going off. I am the morning person in the house, everyone else is a night owl. That's nice for me, I love my alone time in the morning.

Have a blessed day!

Supplies
Stamps-Sweet Thing, Sentiments (The Angel Company)
Paper-Gina K 120# White, blue pattern paper (stash), cherry (Bitty Star Basics, Papertrey)
Ink-Pure Poppy
Accessories-square nestibilities, stardust stickles